Slither
is apparently "hard". I dispute that.
Here's a three (or four, depending how you look at it) step guide as to how I believe you can make Slither significantly easier and not have the headache of having to submit a score of 0.
(Also created at the request for a Slither tutor session from Enigma. Well here you go-)
~~~~~
Step 1: A good map.
~
The first - and arguably, most important - step of winning at Slither is a big RNG factor. Fortunately for you, you can quite easily reroll maps if they're poor.
Ideally*, you must have;
- 3 VISIBLE portal entrances
- 3 VISIBLE portal exits
- No dead ends (i.e, if prey spawns there you have to die to eat it)
- As little obstacles as possible (as this is uncontrollable, make your own judgement.)
(*: I say ideally... but really, for the best chance, all of these are pretty much compulsory.)
Preferrably, a non-event month (May) is also best as there won't be any event obstacles, which take longer to recognize than rocks and logs and usually have a transparent background, making them look for a split second like they're part of the background.
Another preference is that the portals are at least one block away from the edge of the map. That gives you time to respond when going through them for the first time, and in case you miss them while trying to go through them, later you don't lock yourself out of that portal. However, not entirely necessary for it to be a good map.
Here's a terrible map;
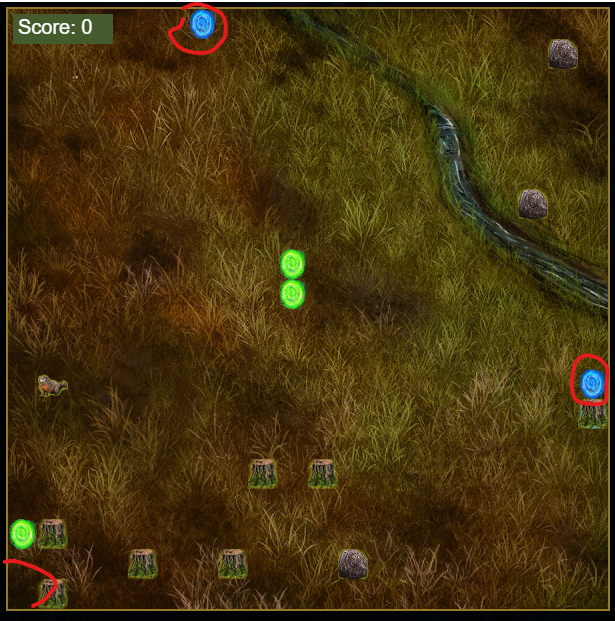
The issues here are in red. (And one other I forgot to highlight)
- The bottom left corner is a dead end. Should prey spawn there, there is physically no way for the snake to eat it before it gets killed against a wall.
- While there are three portal entrances, the one in the bottom left will pose problems as it's against a wall.
- While I know the third exit portal is kind of visible, it's best to take no chances if it's on top of something else. So in all practicality I can only clearly identify TWO exit portals - worse, they're both all on the edges of the map.
~
If you get a terrible map, reroll. Simply just click left and wait for your snake to die at the edge of the screen.
Now here lies a hideous pitfall of doom here that's caught many people before. Do not click Send Score! I know it's delayed, but remember not to click the top button where it intuitively might be.
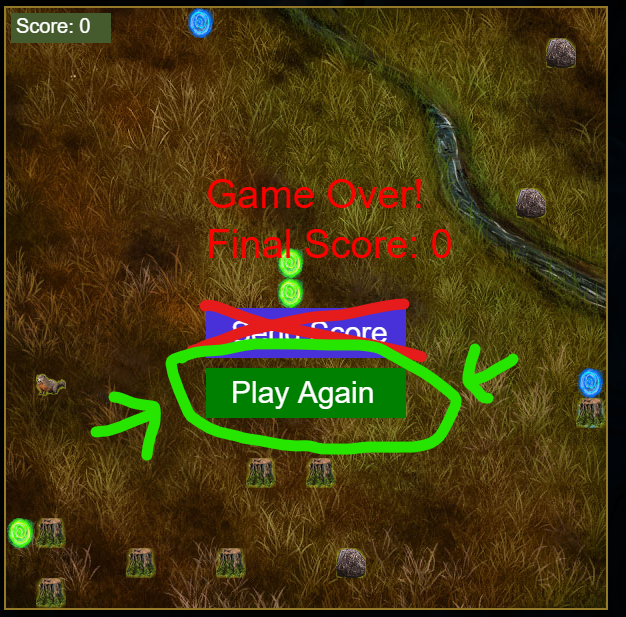
Keep rerolling until you get a good map.
~
Here is an example of a good map;
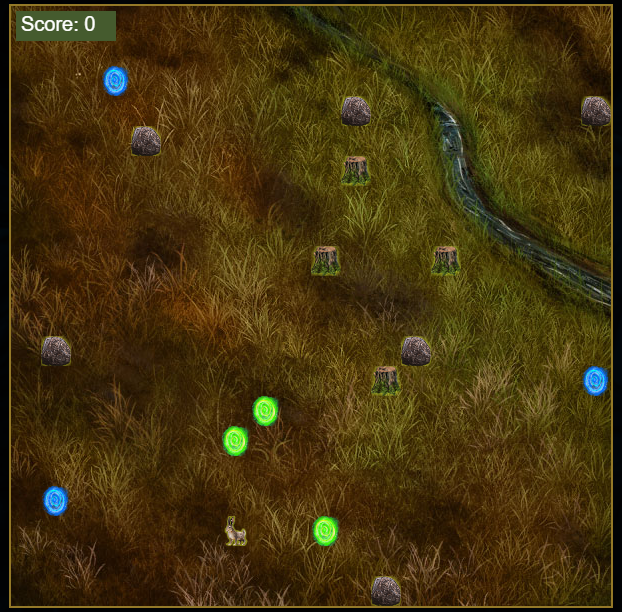
Yes, I know I said I had a preference of the portals being at least one block away from the map. I gave up on rerolling, and this one is good enough for demonstration purpouses.
However, this ticks all the compulsory boxes. Three visible portals' entrances and exits, 10 obstacles, and most importantly no dead ends.
Congrats! You now have a good map!
~~~~~
Step 2: Identifying linking portals.
~
The first step before you waste the time and effort gobbling up that rabbit is to figure out which portal links to which exit. There are a few things to remember while doing this;
- Never enter a portal where, if there is an exit next to a wall, that can kill you at this stage. In my case, I have a wall to the right of one of my exit portals. At this stage, I cannot enter my portals from the left. I'd risk losing my good map otherwise, because if the one I enter in goes into the one on the wall and I enter from the left... yeah. I'm going to instantly die.
- Ideally, I'd figure out the direction I'd enter all my portals in before even starting the map. As seen, there is also a second portal really close to the edge. Only in that one, I'd die if I entered it from the right. So my conclusion would be - at this stage, enter all my portals from the top heading downwards. Basically, try use logic to see - if you enter in all four directions, which one is consistently the least hazardous?
- Identify which exit portal travels you furthest from the entrance portal. Ideally, it'd be the furthest away entrance connecting to the furthest exit.*
This is useful knowledge for the next step, and also in the highly likely case a prey spawns on top of an entrance portal - you don't want to be going into a portal for the first time with 100 prey eaten and not know where you're going in the map!
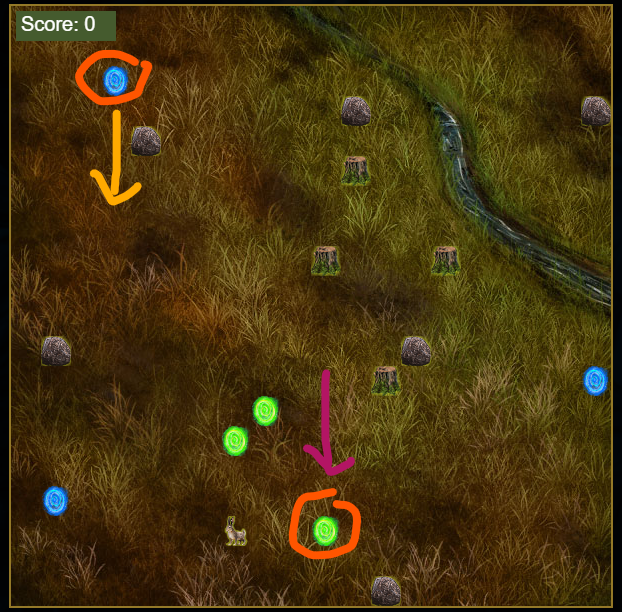
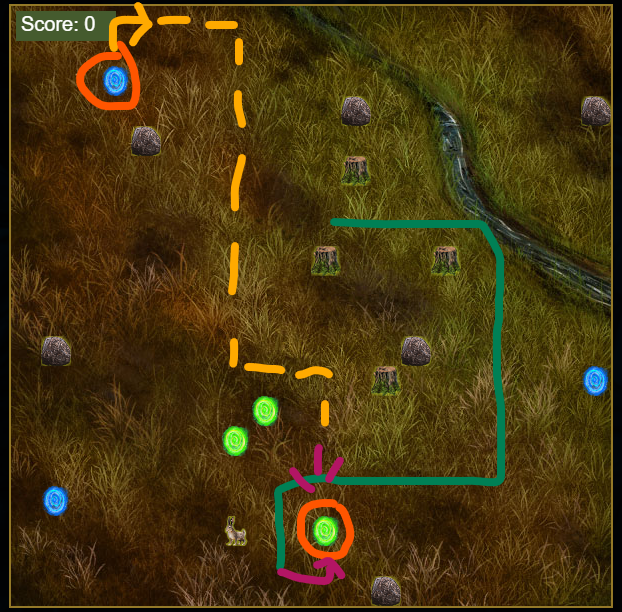
For the purpouses of demonstration, let's assume in my map the portals connect like this.

I can idntify from this that the two entrances/exits furthest away from each other are the orange ones. We're going to ignore the grey and blue portals for now - but then, if a prey ever spawns in on top of one of those, you know where you're going!
*: Why are we using the portals furthest away from each other? Well, you don't necessarily have to, but it's a preference so that you have the maximum amount of maneuvering space once you start the next step.
Read on!
~~~~~
Step 3: Figuring out a cycle.
~
The next step is actually beginning to play the game.
Now we know where the portals themselves link up, it is possible to continuously use them. After the bug patch that eliminated the snake from dying after it went through a portal for no reason, this is all set.
All you need is a cycle of sorts.
We've picked the orange portal line. (Like stated earlier; you don't have to use the furthest ones, but it gives you more space to think and move around in.) The trick here now is to use that portal over and over again.
I'm doing a bad job of explaining it, and my computer is bad at responding to my screenshot key, so here's a visual with coloured lines;
1) Imagine my snake is travelling down the purple arrow. It will emerge at the light orange arrow - we know that because the orange portals link.
2) To make a cycle, plot a path to get back to the purple arrow from the light orange arrow that goes through any prey you spot. Ensure the path does not overlap itself (else you'll just crash into yourself). In this case it's the green line.
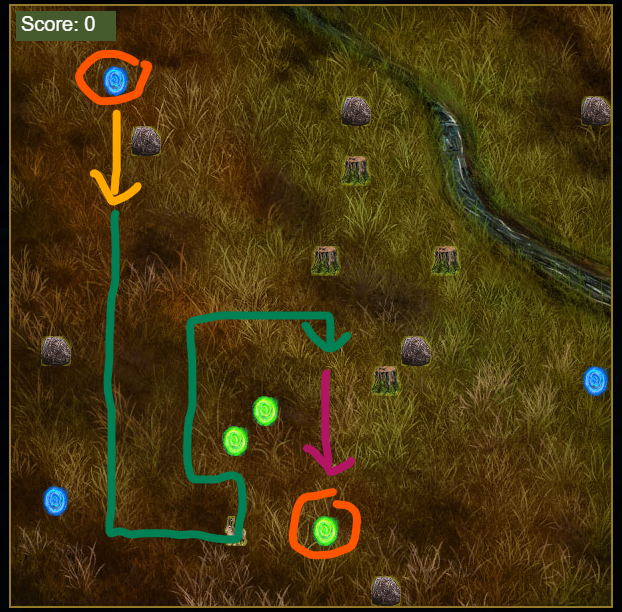
3) Repeat 1 and 2.
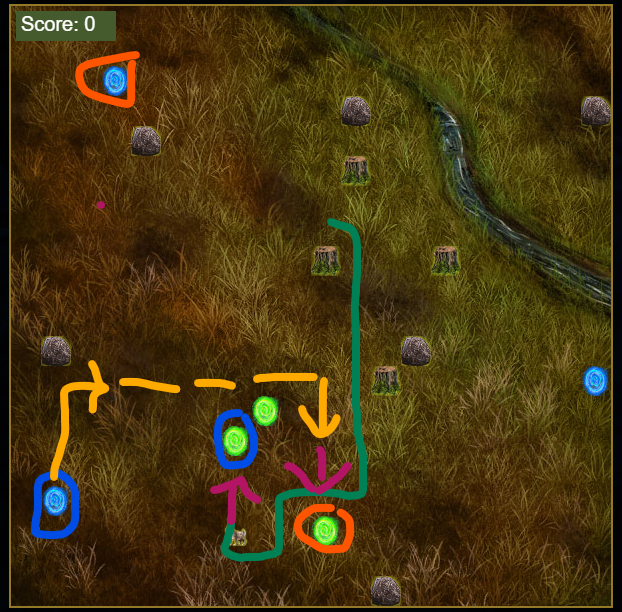
Let's pretend the prey is somewhere else;
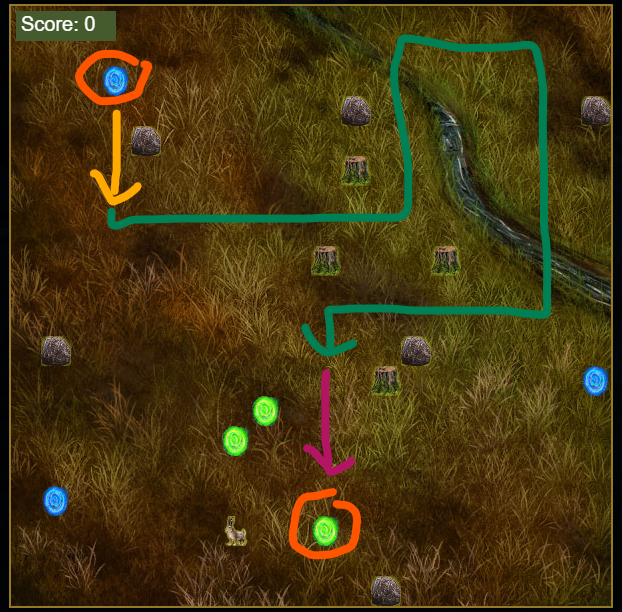
As long as you can always find a way from light orange to purple, facing the correct direction, you are fine. Think of the light orange as "departure" and purple as "destination", if that helps.
(Hopefully this also explains why we want the furthest away linking portals - gives you more space to move!)
Unless it's really easy, try not to go for more than one prey every cycle. You risk accidenally using your long snake's body to block off your path to the endpoint. Also, remember not to get too overconfident and accidentally lock yourself in a coil of your own snake. As long as you keep going through the portal, over and over, it is safe.
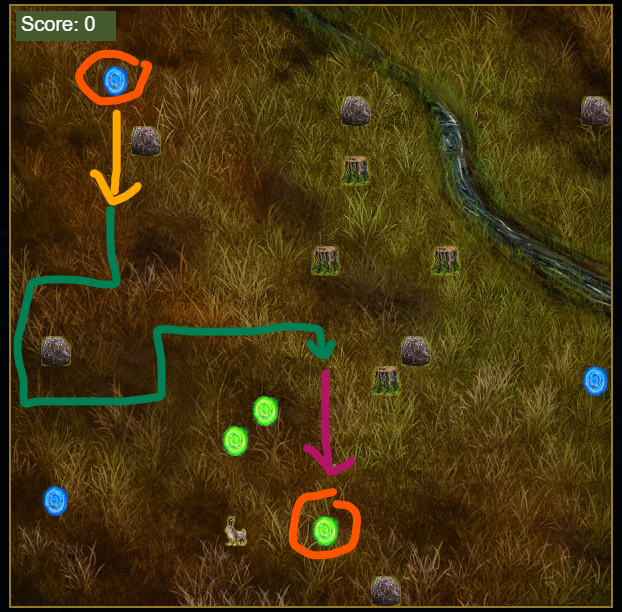
What if I miss? While that'd be not ideal, just try to go through the deisgnated portal that you chose. Even from a different direction, the end result is still the same; you go through the portal and can go through it again. If you can't - just go through any portal and re-establish the cycle. While messing up the cycle is unfortunate, there has to be... let's call it a contingency plan? Since you already know how the other portals link, you should be able to use those to reset your cycle.
If you miss, going through a portal - any portal - is crucial, though. It will allow the map to be cleared so you don't have to avoid your own snake as you maneuver to recover from missing and re-establishing the cycle.
(Imagine dotted lines = result of you missing. My application is being wierd so apologies that some of the lines are just missing for some wierd reason)
~~~~~
Step 4 (kind of?): Things to note!
~
Don't play Slither on mobile. Swiping has a delay in input, and you end up turning one block late often - keyboard input does not have a delay. Additionally, swiping as a lot more energy-intensive than clicking an arrow button.
~
Treat ground your snake has just passed through forever gone until you go back through the portal again. In a way, think of it like rebooting your computer to get rid of the accumulated errors - even though you'd never reboot your computer every few seconds, think of it like that. All the ground your snake covers after coming through the portal is locked off until you get back through again.
~
If you're unsure, just keep going through the cycle without eating the prey until you've figured out a route. "Better to be safe than sorry" applies here quite a lot.
~
Try leave as much room as possible in case you misclick and are one block off. That way you can recover, even if you need to do some funky maneuvering to get back to the purple arrow.
~
Don't leave clicking the arrows until the last minute. That runs the risk of misclicking and going oopsie.
~
Please, please don't try to turn backwards and forwards really quickly. I get it - it's a really good way to stack your snake up and give yourself time, but then that's the point of the portals. Try not to stack your snake up by going left, then right one block down, and so on, because there's an unfortunate way that if you click that too fast you end up killing yourself.
Example:
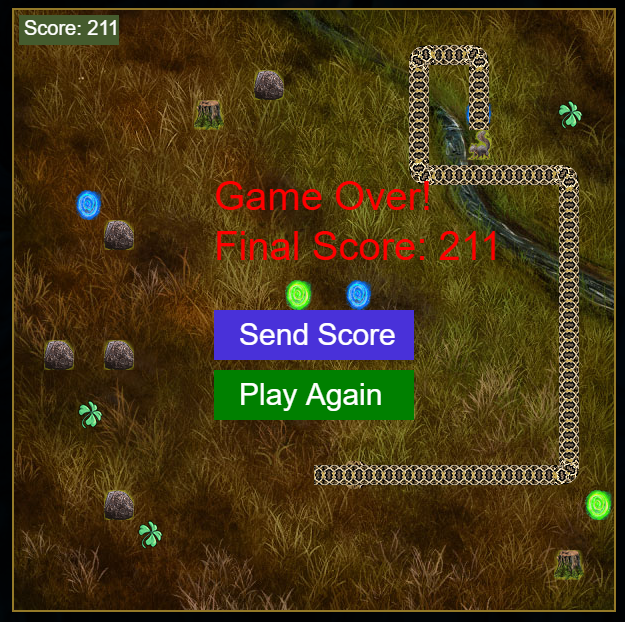
I clicked up and right too qickly before my snake had travelled that one block up. Poof! 211 run over.
~
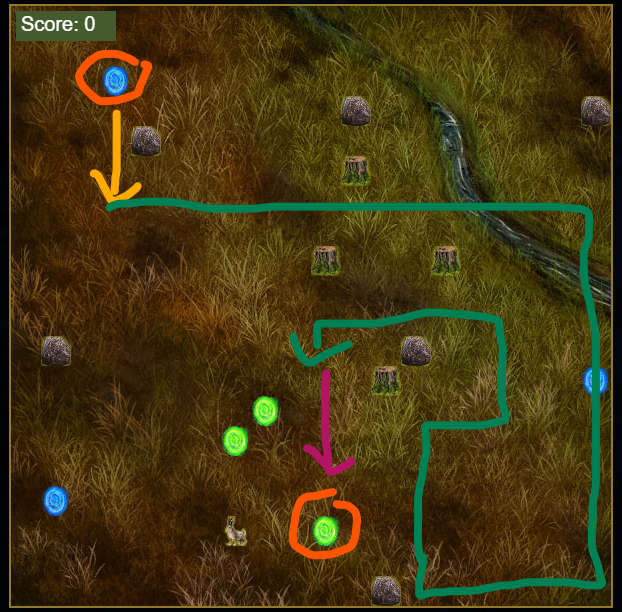
In an ideal world, get two linking portals where you can just keep going through them if you need to cool down. This is a fun thing to have but not necessary - here's an example!
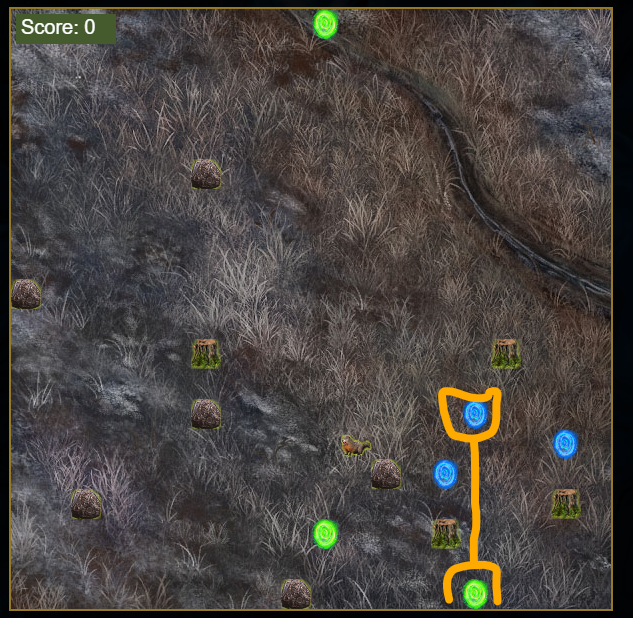
For demonstration, assume the two portals indicated link up. If you need to leave for any certain period, or just want a moment to calm down after concentrating so hard non-stop, having two portals that link up without any movement is a great way. You can just let the snake keep going down and it won't die.
~
That's pretty much it I think-
Let me know if I missed anything! I did write this in a bit of a rush lol


